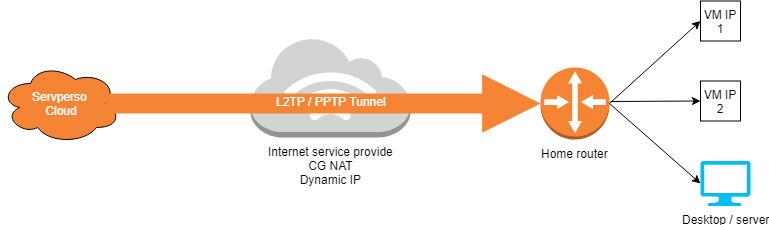
Recently, we offer the possibility of getting a tunnel with IPv4 without BGP and without getting an entire /24.
This article introduces the service as well as how to deploy it on Mikrotik Router OS
What is NoBGP?
Overall, it is a PPTP / L2TP type tunnel on which we directly rout IPv4 and public IPv6. You then need to deploy a router to maintain the tunnel and provide public IPs.
Benefits
Having a WAN IP behind a connection does not provide it at a derisory cost.
Don’t have to buy an /24 range and manage BGP sessions
Possibility to develop a HA version for PRO use.
Implementation on Mikrotik Router OS
This tutorial takes into account that the router will be “dedicated” to this use. This means that all router traffic will go back into the tunnel.
Traffic from “servperso” IPs must send their outbound traffic through the tunnel. Without it, it will be filtered by your ISP as it will look like an attempt at SPOOF.
This tutorial considers the following points:
- You have deployed Mikrotik Router OS
- You have set the admin password
- You have activated the license.
- You have subscribed to a NOBGP offer as well as an additional ip block and received the tunnel identifiers.
Step 1 – Connect the Mikrotik router to the internet.
We will start on the assumption that you are using DHCP on your LAN. Regardless of the method used, it is important that the route distance is higher than that of the NOBGP tunnel for traffic to pass through the tunnel.
To create the DHCP client go to IP > DHCP CLIENT.
Then press the blue “+” at the top left, select the right interface and change the “Default route distance” to 20 in the “Advanced” tab. Enable the default route and dns if necessary.
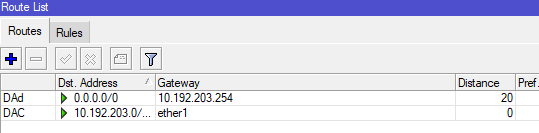
If you did the manipulation well, your client will take an ip and the route list (visibe in IP > ROUTES) should look like this (with your IPs).
Step 2 – Creating the VPN client
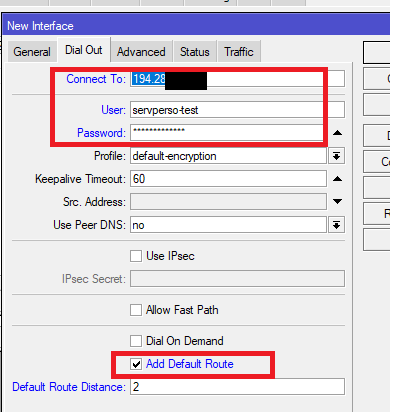
The NOBGP offer offers either to connect in PPTP or L2TP. You have received an “endpoint”, a “user” and a “pass”. In our example we will use L2TP.
The difference is that PPTP uses GRE and L2TP uses UDP to transport packets.
To add the VPN go to “interfaces” and click on the “+”. Then select “L2TP Client”.
In the “Dial Out” tab, enter the host in “connect to” and your username and password. Also check “Add default route”
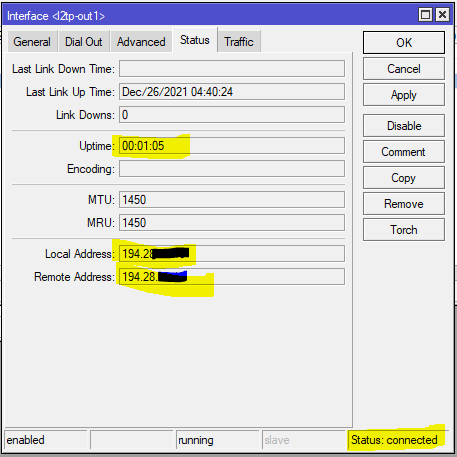
the VPN connects and you receive a wan ip in local address.
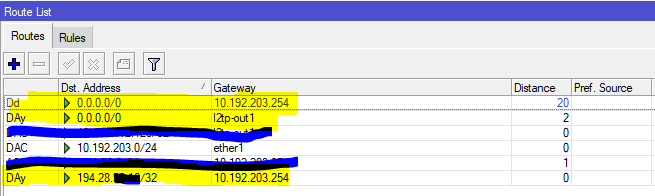
We also see a /32 route that uses the router’s native gateway to maintain traffic to the Tunnel server.
MTU – performance problem (slowness + speed)
As all traffic passes through the tunnel, the MTU cannot make 1500. We set it at 1450.
The MSS corresponds to the MTU – IP – TCP. That’s 40 for IPv4 and 60 for IPv6.
MSS IPv4: 1410, MSS IPv6: 1390
Normally, the MTU is self-traded using ICMP. However, many administrators simply filter the ICMP, however, it is possible to force it directly via the firewall with the following rules.
It is necessary to apply the rules in both directions on the L2TP tunnel created in the previous steps
MTU IPv4
/ip firewall mangle
add action=change-mss chain=forward in-interface=l2tp-out1 new-mss=1410 passthrough=yes protocol=tcp tcp-flags=syn tcp-mss=1411-65535
add action=change-mss chain=forward new-mss=1410 out-interface=l2tp-out1 passthrough=yes protocol=tcp tcp-flags=syn tcp-mss=1411-65535
MTU IPv6
/ipv6 firewall mangle
add action=change-mss chain=forward dst-prefix=::/0 in-interface=l2tp-out1 new-mss=1390 passthrough=yes protocol=tcp src-prefix=::/0 tcp-flags=syn tcp-mss=1391-65535
add action=change-mss chain=forward dst-prefix=::/0 new-mss=1390 out-interface=l2tp-out1 passthrough=yes protocol=tcp src-prefix=::/0 tcp-flags=syn tcp-mss=1391-65535
Mode NAT
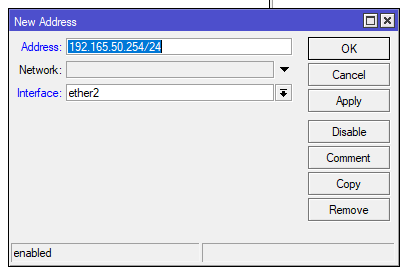
In our example, we will use 192.168.50.0/24 as the internal network and 192.168.50.254 as the gateway.
Adding internal ip range
IP > ADDRESSES > click on the “+” at the top left
Creating the NAT Rule
/ip firewall nat
add action=masquerade chain=srcnat out-interface=l2tp-out1 src-address=192.168.50.0/24
Direct allocation of public IP subnets.
The allocation of public IP is done in the same way as the allocation of “internal” IP. You just don’t have to do NAT with the block. The IP assigned to the mikrotik router will be the gateway to be used on the machines behind.
Remember that the first and last IP of an ipv4 block could not be used (network / broadcast).
Bonus: configuring a firewall
Here is a minimalist firewall that aims to protect the router without protecting the rest. It therefore blocks all incoming traffic. To continue managing the router, you must whitelist your own IPs. (purpose of the second rule).
/ip firewall filter
add action=accept chain=input comment= »estab related » connection-state=established,related
add action=accept chain=input comment=mgmt src-address=<your management ip range>
add action=accept chain=input comment=ICMP protocol=icmp
add action=drop chain=input comment= »DEF DROP »